


This article provides overview of Device Settings available on the Lorex Classic App. You can configure settings for your 2K Pan-Tilt Outdoor Wi-Fi security camera (F461AQ) from anywhere using the Lorex Classic App.
Device Settings Overview
From the Devices screen, tap  icon to configure device settings.
Note: Device settings differs between products. Your device settings may not include all the settings from the example below.
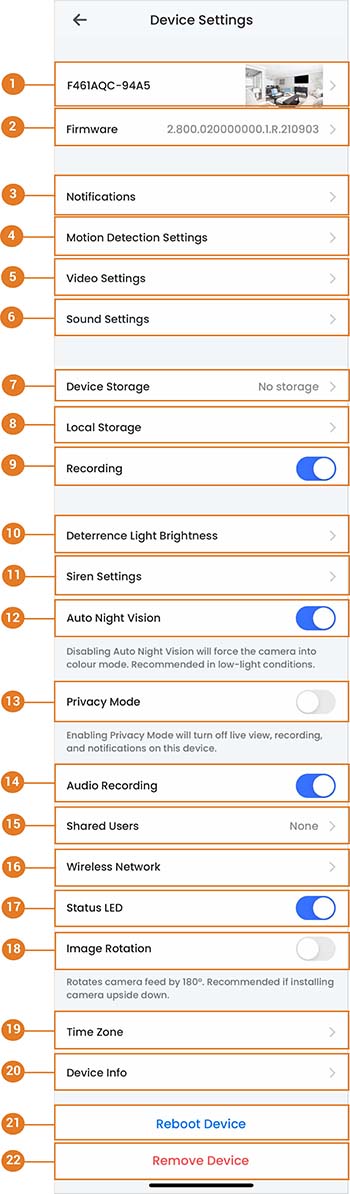
Basic Information: Tap to change the device password, set device name, change thumbnail photo, or view device ID. For full instructions, see Basic Device Settings.
Firmware: Tap to view the current and latest firmware version.
Notifications: Enable/disable notifications. For full instructions, see Notification Settings.
Motion Detection Settings: Enable/disable motion detection and person/vehicle detection per channel on supporting platforms. For full instructions, see Motion Detection Settings.
Video Settings: Tap
 icon to enable HDR (High Dynamic Range).
Note: Enabling HDR optimizes video picture in high-contrast conditions such as under-lit and over-lit areas.
By default, the video quality is set to High.Sound Settings: Tap to adjust the Siren or Two-Way Talk volume.
Device Storage: Tap to view or format your device storage. For full instructions, see Device Storage.
Local Storage: Tap to change the streaming quality or enable/disable General Record Storage. For full instructions, see Local Storage.
*Recording: * Tap
 icon to disable recording. Tap again to enable.
Deterrence Light Brightness:
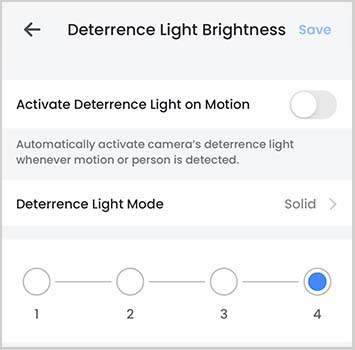
- Tap the icon to enable Deterrence Light on Motion.
Note: Motion Detection must be enabled to activate the deterrence light on motion.
- Tap Deterrence Light Mode to select either Solid or Flashing mode for the deterrence light.
- Tap and select the level of Deterrence Light Brightness.
- Tap Save to apply any changes.
Siren Settings: Tap the
icon to enable Activate Siren on Motion. Auto Night Vision: Tap
icon to disable Auto Night Vision. Tap again to enable.
Note: Disabling Auto Night Vision will force the camera into color mode. Recommended in low-light conditions.Privacy Mode: Tap
icon to enable privacy mode. Tap again to disable. *Audio Recording: *Enable/disable audio recordings per channel. (audio-enabled cameras required)
Shared Users: Tap to send an invitation to another Lorex Classic App account to access the selected device. For full instructions, see Shared Users.
*Wireless Network: *Change the Wi-Fi network that is associated with the camera.
*Status LED: * Tap
icon to disable the status LED on the camera. Tap again to enable.Image Rotation: Tap
icon to rotate the camera feed 180Ã °.
Note: Recommended if you are installing the camera upside down.Time Zone: Tap to change the time zone or to configure Daylight Savings Time. For full instructions on Time Zone, see Configuring Time Zone.
Device Info: View the device's model number, device ID, IP address, and MAC address.
*Reboot Device: *Reboot your Lorex device remotely. Wait a few minutes before connecting to the device after restarting.
Remove Device: Remove device from Lorex Classic App.
Note: Removing your device will not affect recordings or snapshots on your mobile device storage.