This article gives installation instructions for your CN101 Series - 4K IP PoE Wired Turret Camera. For more information, refer to the Troubleshooting Guide or the Frequently Asked Questions (FAQ).
What's Included:
- 4K IP PoE Turret Camera
- Mounting Hardware
- Weather-Resistant Cap
- Ethernet Cable*
*Inclusion varies by model.
NVR Connection:
Before installing, ensure the camera is ready to capture footage by connecting it to your NVR's video input with the Ethernet cable.

Camera Placement Tips:
- Consider what you want to monitor and find the best area for coverage.
- Place the camera close to the area of interest.
- Avoid placing the camera directly in front of obstructions like trees, bricks, rain gutters, or reflective surfaces.
- Install the camera where it is difficult for thieves and vandals to reach.
- Ensure the mounting surface can support at least 3x the camera's weight.
- The ideal position is about 10 ft/3 m above ground, angled 15° downward.
- Secure the cables so they cannot be seen or easily cut.

Camera Installation:
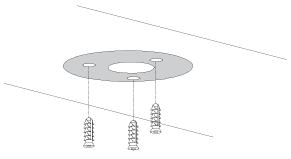
- Place the mounting template on the surface and drill the screw holes. If you plan to run the cable through the wall, also drill the center pass-through hole.
- Insert the anchors if you are mounting on drywall, wood, brick, masonry, or concrete.
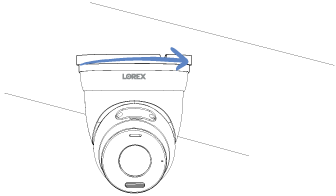
- Twist the mounting bracket counterclockwise to detach it from the camera.
-
- Choose your cable routing method:
- If routing the cable through the wall: Mount the bracket first. You will feed the cable through the wall after the bracket is installed.
- If routing the cable along the wall using the cable notch: Place the cable into the bracket’s notch so it lies flat. Avoid pinching the cable.
- Position the mounting bracket over the holes and fasten it to the wall with the included screws. If using the cable notch, ensure the cable stays aligned so the bracket sits flush.
- Choose your cable routing method:

- Guide the camera's cable through the surface opening or cable notch.
- Connect one end of the Ethernet cable to the camera video output and the other end to the NVR PoE video input.

- Twist the weather-resistant cap onto the camera Ethernet connector. If the connector will be exposed to rain, seal it with silicone or electrical tape.

- Feed the camera cable through the wall opening if you are routing the cable through the wall.
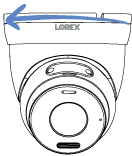
- Align the camera with the installed bracket, adjust the viewing angle, and twist it clockwise until it locks in place.
- Remove the protective vinyl film from the camera lens.