


This FAQ & Troubleshooting Guide covers installation, connection, configuration, and common issues for the Lorex Connect X 2K+ Dual-Lens PTZ Camera with 30× Optical Zoom (CNU01P-MPW-AB1). Use it to configure the two camera channels, Smart Linkage Tracking, Linkage Calibration, IVS / AI analytics, PTZ functions, local storage, audio, and active deterrence.
Need more details? Refer to the camera’s Quick Start Guide, Specification Sheet, and your compatible Lorex NVR User Manual.
TABLE OF CONTENTS
- Quick Fix Checklist (Start Here)
-
Frequently Asked Questions (FAQ)
- How do I install the X Dual-Lens PTZ?
- What are the power and channel requirements?
- How do I turn off the heater / Defog?
- How do I connect the camera directly to the NVR?
- How do I connect the power adapter wires?
- Can I connect the camera through a PoE switch?
- How do I add the PTZ camera to a second channel?
- How do I use PTZ controls?
- How do I create presets, scans, and tours?
- How do I enable Smart Linkage Tracking?
- How do I perform Linkage Calibration?
- How does Smart Linkage Tracking operate?
- How do I display person and vehicle bounding boxes?
- How do I link a PTZ preset to an IVS / AI event?
- How do I reset the camera or install a microSD card?
- What are the camera and wall-mount dimensions?
- What are the key camera specifications?
- What AI and deterrence features are supported?
- Does the camera support audio?
- Does the camera support ONVIF and RTSP?
- Does the camera support local storage?
- What is the operating temperature and weather rating?
- What comes in the box?
-
Troubleshooting
- Camera does not power on / no image
- Camera offline / not detected
- Camera functions limited on NVR PoE power
- Only the Fixed Overview Camera appears
- PTZ controls not responding
- PTZ camera moves on its own
- Smart Linkage Tracking not working
- PTZ camera does not return to the Start Point
- Preset, scan, or tour not working
- PTZ linkage not working with IVS / AI analytics
- IVS / AI analytics not detecting events
- Person or vehicle bounding boxes do not appear
- Linkage Calibration page is blank / calibration is inaccurate
- PTZ camera image is out of focus
- Image is too bright, too dark, or unclear at night
- Motion detection or event recording triggers constantly
- Audio / two-way talk not working
- Deterrence light, siren, or message does not activate
- microSD card not detected / local recording not working
- Camera does not reset
- Helpful Tips
Quick Fix Checklist (Start Here)
- Power: Confirm that the camera is receiving power from a supported PoE source or the included power adapter. A compatible NVR PoE port can provide up to 30 W. If the camera’s power requirements exceed the available power, certain functions may be limited. For full camera functionality while using the heater, use the included power adapter or a PoE++ switch.
- Channels: Confirm that the NVR has two available channels: one for the Fixed Overview Camera and one for the PTZ camera.
- Startup: Allow at least 2 minutes for the camera to complete its startup sequence.
- Connection: Confirm that the Ethernet cable is connected to a compatible NVR PoE+ port or external PoE+ or PoE++ switch.
- Cable: Use a CAT5e or higher Ethernet cable up to 300 ft (91 m).
- Second view: If only the Fixed Overview Camera appears, add the PTZ camera to an empty channel using Remote Channel CH-2.
- PTZ controls: Select the PTZ camera channel before opening PTZ controls.
- Tracking: Complete Linkage Calibration before enabling Smart Linkage Tracking.
- Automatic functions: Disable Smart Linkage Tracking to use presets, scans, tours, or IVS / AI-triggered PTZ preset movements.
How do I install the X Dual-Lens PTZ?
- Plan first: Confirm that the NVR has two available channels and plan the power connection. If using the included power adapter, confirm that a suitable power outlet is within reach of the adapter cables.
- Test first: Connect the camera and confirm that both views and the PTZ controls work before permanent installation.
- Use a suitable surface: The mounting surface must support the 9.92 lb (4.5 kg) camera, wall mount, and mounting hardware.
- Use the safety cable: Attach the included camera safety cable while installing the camera.
- Protect the connection: Install the weather-resistant RJ45 cable gland if the Ethernet connection may be exposed to moisture.
- Complete all wiring first: Do not apply power to the camera until it is securely supported and all wiring is complete. If using the included power adapter, keep it unplugged until all wiring is complete.
- Set the overview angle: Adjust the Fixed Overview Camera lens to its final 11°-25° angle before performing Linkage Calibration.
What are the power and channel requirements?
The X Dual-Lens PTZ can operate from a compatible NVR PoE port when its power consumption remains within the available power. If the camera’s power requirements exceed the available power, certain functions may be limited.
- Power adapter input cable: 4.9 ft (1.5 m)
- Power adapter output cable: 6.6 ft (2.0 m), ± 2 in (5 cm)
-
NVR channels: Two available channels are required.
- Channel 1: Fixed Overview Camera
- Channel 2: PTZ camera
How do I turn off the heater / Defog?
The heater is controlled by the Defog setting and is disabled by default. If Defog has been enabled and the camera is powered from an NVR PoE port that provides up to 30 W, turn off Defog to reduce camera power consumption.
- From Live View, right-click twice to open the Main Menu.
- Go to Settings > Channel > Image > Image Enhancement.
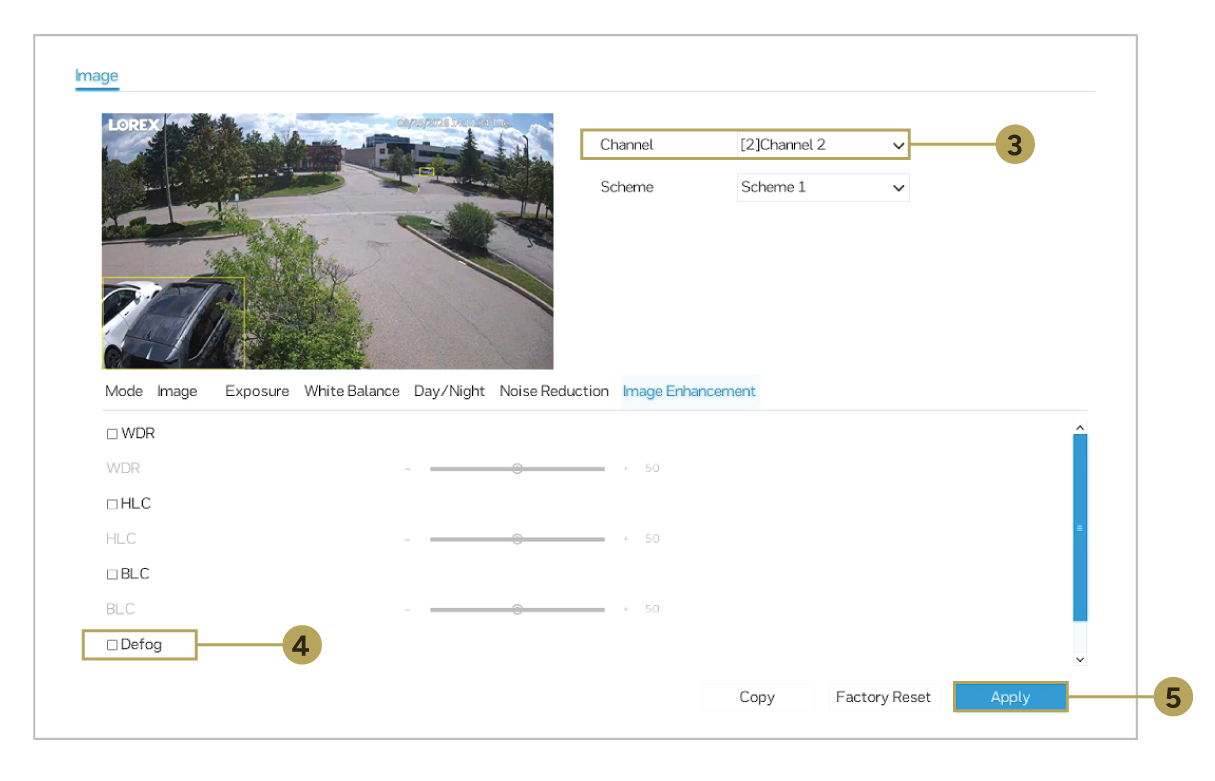
- Select the PTZ Channel.
- Clear the Defog checkbox.
- Click Apply to save the settings.
How do I connect the camera directly to the NVR?

- Connect the camera’s Ethernet connector to a CAT5e or higher Ethernet extension cable.
- Connect the extension cable to an available PoE+ port on the compatible NVR.
- If using the included power adapter, connect the camera to the power adapter, but do not plug in the adapter until all wiring is complete.
- Install the included weather-resistant RJ45 cable gland if the Ethernet connection may be exposed to moisture.
- Connect any optional Audio or Alarm I/O devices.
- If using the included power adapter, plug it into a suitable outlet or surge protector. Allow the camera to complete its startup sequence.
- Confirm that the Fixed Overview Camera appears on the channel corresponding to the NVR PoE port.
- Add the PTZ camera to a second available channel using Remote Channel CH-2.
How do I connect the power adapter wires?

- Keep the power adapter unplugged while making the connection.
- Insert the camera’s red positive and black negative wires into one side of the included 6-pin connector.
- Connect the adapter’s red positive wire directly opposite the camera’s red wire.
- Connect the adapter’s black negative wire directly opposite the camera’s black wire.
- Tighten the terminal screws and gently pull each wire to confirm that it is secure.
- Verify the polarity before plugging in the adapter.
Can I connect the camera through a PoE switch?
Yes. Connect the X Dual-Lens PTZ and NVR to the same local network using an external PoE+ or PoE++ switch and router.

- Connect the PoE switch to the router.
- Connect the NVR’s LAN port to the same router.
- Connect the camera to the PoE switch using a CAT5e or higher Ethernet cable.
- If using the included power adapter, connect the camera to the power adapter.
- On the NVR, go to Main Menu > Settings > Channel > Camera.
- Click Search Device, select the X Dual-Lens PTZ, and click Add.
- Wait for the status indicator to turn green.
- After the Fixed Overview Camera appears, add the PTZ camera to another channel using Remote Channel CH-2.
How do I add the PTZ camera to a second channel?
The Fixed Overview Camera and PTZ camera use separate NVR channels.

- In Live View, click + on an empty channel.
- In Manually Add Devices, select the channel where the X Dual-Lens PTZ is connected.
- Set Remote Channel to CH-2.
- Click OK.
- Wait for the PTZ camera image to appear in the destination channel.


How do I use PTZ controls?
- In Live View, select the PTZ camera channel.

- Click
 PTZ in the Quick Camera Toolbar.
 - Use the direction, zoom, focus, iris, speed, and Auto Focus controls as needed.

How do I create presets, scans, and tours?
Open the PTZ controls, then click the arrow beside the current menu name. The menu opens to Advanced by default. Continue clicking the arrow to cycle through Advanced, Preset, Scan, and Tour.

-
Preset: Open the Preset menu, click Add, move the PTZ camera to the required position, select a preset number, enter a name, and click Save.


-
Scan: Open the Scan menu, select a scan number, click Edit, set the first position with
 Start, set the second position with
  Pause, and then click Go To to start the scan.


-
Tour: Open the Tour menu, select a tour number, click Edit, add saved presets and their dwell times, click Save, and then click Go To to start the tour.


How do I enable Smart Linkage Tracking?
From Live View, right-click twice and go to Settings > Channel > Auto Tracking.
Select the Auto Tracking tab.

- Channel: Select the fixed overview camera channel associated with the dual-lens PTZ camera.
- Auto Tracking: Enable Smart Linkage Tracking.
- Time Of Duration(s): Set the maximum amount of time the PTZ camera follows a target.
- Start Point: Select the preset position that the PTZ camera returns to after tracking ends. The preset must first be created on the PTZ camera channel.
-
Tracking type: Select one of the following:
- Person Only: Tracks moving people only.
- Vehicle Only: Tracks moving vehicles only.
- Person or Vehicle: Tracks both moving people and vehicles.
- Person Priority: Tracks both people and vehicles but gives priority to moving people.
- Vehicle Priority: Tracks both people and vehicles but gives priority to moving vehicles.
In a priority mode, the PTZ camera switches to a moving target of the higher-priority type when one is detected. When tracking ends, the camera returns to the selected Start Point. - Static Target Filter: Enable to reduce tracking of targets that remain stationary.
- Filter Sensitivity (0-100): Adjust the sensitivity of the Static Target Filter.
- Tracking Target Highlight: Enable to highlight the target currently being tracked.
- Target Stationary Timeout (1-300): Set how long a target can remain stationary before tracking ends.
- Click Apply to save the settings.
How do I perform Linkage Calibration?
Linkage Calibration maps locations in the Fixed Overview Camera image to corresponding PTZ positions. Complete it after installation and whenever the camera, wall mount, or Fixed Overview Camera lens angle changes.
- Set the Fixed Overview Camera to its final viewing angle.
- Confirm that both channels are online and that manual PTZ controls work.
- Go to Settings > Channel > Auto Tracking > Linkage Calibration.

- Under Channel, select the PTZ camera channel.
- Delete all existing calibration points, including the factory points.
- Make sure Test Calibration is off.
- Click a stationary, identifiable point in the Fixed Overview Camera image.

- Move and zoom the PTZ camera until the same point is centered in the PTZ image.
- Click Add.
- Create five points: one near the center and one near each corner of the Fixed Overview Camera image.

- Click Finish.
- Enable Test Calibration and test several locations across the image.
How does Smart Linkage Tracking operate?
The Fixed Overview Camera detects supported people and vehicles, and the PTZ camera moves toward and follows the selected target. Tracking is limited to the Fixed Overview Camera’s field of view and ends when the target leaves that view.
If a Start Point preset is selected, the PTZ camera returns to it after tracking ends. While Smart Linkage Tracking is enabled, presets, scans, tours, independent operation of the two views, and IVS / AI-triggered PTZ preset movements are unavailable or overridden.
How do I display person and vehicle bounding boxes?
- Go to Settings > IVS > AI Multi-Target.
- Select the Fixed Overview Camera channel.
- Enable Person Detection and Vehicle Detection.
- Set Bounding Box to ON.
- Click Apply.

How do I link a PTZ preset to an IVS / AI event?
A supported IP camera, including the Fixed Overview Camera, can detect an analytics event and trigger the X Dual-Lens PTZ camera to move to a saved preset.
- Disable Smart Linkage Tracking.
- Go to Settings > IVS.
- Open Smart Analysis, Behavior Analysis, or ES Analysis, and select the analytics feature.
- In the main Channel field, select the camera that will detect the event.
- Enable and configure the analytics feature.
- Open Event Actions and enable PTZ.
- Under PTZ > Channel, select the PTZ camera channel that should respond, then select the required Preset.
- Click Apply.

How do I reset the camera or install a microSD card?
The reset button and microSD card slot are located inside the microSD/reset compartment.

- Loosen the two cover screws using the included Allen key, and remove the microSD/reset cover.
- To reset: Confirm that the camera is receiving power and is powered on. Press and hold the reset button for 5 seconds.
- To install storage: Insert a microSD card up to 1 TB into the card slot.
- Reinstall and secure the cover.
What are the camera and wall-mount dimensions?
- Overall camera dimensions (W × D × H): 6.93 × 8.32 × 11.96 in (176.0 × 211.3 × 303.9 mm)
- Camera weight: 9.92 lb (4.5 kg)
- Wall-mount plate: 4.29 in wide × 6.46 in high (109.0 × 164.0 mm)
- Mounting-hole spacing: 3.35 in horizontal × 5.59 in vertical (85.0 × 142.1 mm)
- Mounting holes: 3 × M6

What are the key camera specifications?
- PTZ resolution: 5MP (2592 × 1944)
- Fixed Overview Camera resolution: 4MP (2592 × 1520)
- Maximum frame rate: 30 fps
- PTZ lens: 5.3-159 mm, F1.6-F4.3 motorized varifocal
- PTZ optical zoom: 30×
- Fixed Overview Camera lens: 2.8 mm, F1.0 fixed
- Fixed Overview Camera field of view: 112° horizontal, 60° vertical, 115.7° diagonal
- IR night vision: Up to 656 ft (200 m) in total darkness under ideal conditions
- Wide Dynamic Range: 120 dB True WDR
What AI and deterrence features are supported?
- Detection: Person, Vehicle, Intrusion, Loitering, Wrong-Way, Unauthorized Parking, Smoke and Fire
- Perimeter Protection: Line-Crossing and Dual-Line Crossing
- Tracking and Monitoring: Smart Motion and Smart Linkage Tracking
- Crowd Analytics: People Counting
- Active Deterrence: White light, siren, and pre-recorded messages
Does the camera support audio?
Yes. The camera includes a built-in microphone and speaker and supports two-way talk. It also provides Audio In and Audio Out connections for compatible external audio devices.
Note: Audio recording is disabled by default. Follow all applicable laws and regulations when enabling audio recording.
Does the camera support ONVIF and RTSP?
Yes. The camera supports ONVIF Profiles S/T/G/M and RTSP. For complete feature support, use a compatible Lorex NVR.
Does the camera support local storage?
Yes. The camera supports a microSD card up to 1 TB for independent local recording.
What is the operating temperature and weather rating?
- Weather rating: IP66
- Operating temperature: -40°F to 140°F (-40°C to 60°C)
- Operating humidity: ≤ 90% RH
The camera is not intended for submersion. Installation in a sheltered location is recommended.
What comes in the box?
- 1 × Lorex Connect X 2K+ Dual-Lens PTZ Camera with 30× Optical Zoom
- 1 × Mounting template
- 1 × Mounting bracket
- 3 × Stainless steel screws
- 4 × Expansion screws
- 1 × Box wrench
- 1 × Hex wrench
- 1 × 6-pin connector
- 1 × Camera safety cable
- 1 × Weather-resistant RJ45 cable gland
- 1 × Power adapter and cable
- 1 × Pair of ESD gloves
Camera does not power on / no image
- Allow at least 2 minutes for the camera to complete its startup sequence.
- Confirm that the camera is receiving power from a compatible NVR PoE port, PoE switch, or the included power adapter.
- If using the included power adapter, verify that the adapter’s red positive wire is connected opposite the camera’s red wire and that the black negative wires are connected opposite each other.
- Confirm that the Ethernet cable is connected to a compatible NVR PoE+ port or external PoE+ or PoE++ switch.
- If using a PoE switch, confirm that the camera and NVR are connected to the same network.
- Use a CAT5e or higher Ethernet cable no longer than 300 ft (91 m).
- Check for damaged or loose Ethernet connections and test another cable if needed.
Camera offline / not detected
- Confirm that the camera is receiving power from the NVR PoE connection, PoE switch, or included power adapter.
- Confirm that the camera, PoE switch, router, and NVR are powered and connected correctly.
- Make sure the camera and NVR are connected to the same local network.
- Confirm that the NVR has two available camera channels.
- Go to Main Menu > Settings > Channel > Camera and click Search Device.
- Restart the camera and search again.
- For current NVR compatibility, visit lorex.com/compatibility.
Camera functions limited on NVR PoE power
- A compatible NVR PoE port can provide up to 30 W. If the camera’s power requirements exceed the available power, certain functions may be limited.
- The heater is disabled by default. If the heater has been enabled, turn off Defog when operating the camera from an NVR PoE port that provides up to 30 W.
- From Live View, right-click twice to open the Main Menu.
- Go to Settings > Channel > Image > Image Enhancement.
- Clear the Defog checkbox.
- Click Apply to save the settings.
- For full camera functionality while using the heater, use the included power adapter or a PoE++ switch.
Only the Fixed Overview Camera appears
This is expected until the PTZ camera is added to a second NVR channel.
- Confirm that one additional NVR channel is available.
- Click + on an empty Live View channel.
- Select the channel associated with the X Dual-Lens PTZ.
- Set Remote Channel to CH-2, and click OK.
PTZ controls not responding
- Select the PTZ camera channel, not the Fixed Overview Camera channel.
- Confirm that the PTZ camera channel is online and displaying video.
- Wait for the startup sequence to finish.
- Disable Smart Linkage Tracking before controlling the PTZ camera independently.
- Stop any active Scan or Tour.
- Check the Ethernet and network connections.
PTZ camera moves on its own
- Smart Linkage Tracking may be following a supported target.
- A Scan or Tour may be running.
- An IVS / AI analytics event may be triggering a saved PTZ preset.
Smart Linkage Tracking not working
- Confirm that both the Fixed Overview Camera and PTZ camera channels are online.
- Complete Linkage Calibration.
- In Auto Tracking settings, select the Fixed Overview Camera channel and enable Auto Tracking.
- Confirm that the target is moving within the Fixed Overview Camera’s field of view.
- Select the correct Tracking type.
- Review Time Of Duration(s), Static Target Filter, Filter Sensitivity, and Target Stationary Timeout.
- Tracking normally ends when the target leaves the Fixed Overview Camera’s field of view.
PTZ camera does not return to the Start Point
- Create a preset on the PTZ camera channel.
- Select that preset under Start Point in Auto Tracking settings.
- Click Apply.
- Test the preset manually using Go To.
- Review Time Of Duration(s) and Target Stationary Timeout.
Preset, scan, or tour not working
- Select the PTZ camera channel.
- Disable Smart Linkage Tracking.
- Confirm that the preset, scan, or tour was saved correctly.
- For a scan, confirm that both endpoints were defined.
- For a tour, confirm that presets and dwell times were added.
PTZ linkage not working with IVS / AI analytics
- Disable Smart Linkage Tracking because it overrides IVS / AI-triggered PTZ preset movements.
- Confirm that the selected analytics feature is supported by the camera detecting the event.
- In the main Channel field, select the analytics source camera.
- Confirm that the feature, detection area or line, and schedule are configured correctly.
- Under Event Actions, enable PTZ.
- Under PTZ > Channel, select the responding PTZ camera channel.
- Select and manually test an existing PTZ preset.
IVS / AI analytics not detecting events
- Confirm that the analytics feature is supported by the selected camera and compatible NVR.
- Make sure the feature is enabled for the correct source channel.
- Check the detection area, line, target type, direction, sensitivity, time threshold, and schedule as applicable.
- Position the camera so targets move across the detection area or line whenever possible.
- Check for poor lighting, glare, weather, obstructions, or a dirty lens.
Person or vehicle bounding boxes do not appear
- Go to Settings > IVS > AI Multi-Target.
- Select the Fixed Overview Camera channel.
- Enable Person Detection and Vehicle Detection.
- Set Bounding Box to ON and click Apply.
Linkage Calibration page is blank / calibration is inaccurate
- Confirm that both camera channels are added and online.
- Confirm that the PTZ camera responds to manual PTZ controls.
- Set the Fixed Overview Camera lens to its final angle before calibrating.
- Delete the existing calibration points and create five new, widely distributed points.
- Click Finish, and then test several locations across the image.
- Recalibrate after moving the installed camera or adjusting the Fixed Overview Camera lens.
PTZ camera image is out of focus
- Use Auto Focus from the Advanced PTZ controls.
- If using Manual focus, adjust Near Focus or Far Focus.
- Use Auto Focus Once.
- Run Lens Initialization.
- Clean the lens with a soft, slightly damp cloth.
- Avoid aiming the camera directly at intense light sources.
Image is too bright, too dark, or unclear at night
- Adjust brightness, contrast, and WDR settings on the NVR.
- Avoid aiming the camera directly at sunlight, spotlights, or headlights.
- Clean the camera lens area.
- Check for nearby walls, eaves, or other surfaces reflecting IR light into the lens.
- Check for rain, snow, fog, dust, or insects near the camera.
- Add ambient lighting if color nighttime video is required. The camera may switch to black-and-white IR when ambient light is insufficient.
Motion detection or event recording triggers constantly
- Camera movement caused by PTZ controls, Smart Linkage Tracking, a Scan, a Tour, or PTZ linkage may be detected as video motion.
- Adjust motion-detection sensitivity or detection areas.
- Use Person or Vehicle filtering when available.
- Avoid moving trees, flags, traffic, reflections, and other sources of repeated motion.
Audio / two-way talk not working
- Confirm that audio is enabled on the NVR.
- Select the correct camera channel.
- Check microphone, speaker, and volume settings.
- If using external audio devices, check the Audio In and Audio Out connections.
- Confirm that the NVR, app, or client software is not muted.
Deterrence light, siren, or message does not activate
- Confirm that the deterrence action is enabled for the selected event.
- Check the event’s Event Actions and schedule.
- Confirm that the event is being detected.
- For a pre-recorded message, confirm that an audio file is selected.
- Test the deterrence feature manually if supported by the NVR.
microSD card not detected / local recording not working
- Confirm that the microSD card is inserted correctly.
- Use a card with a capacity of 1 TB or less.
- Format the card through the camera interface if required.
- Restart the camera after inserting the card.
- Remember that microSD recording is independent of NVR and cloud recording.
Camera does not reset
- Confirm that the camera is receiving power and is powered on.
- Press and hold the reset button for 5 seconds.
- Allow several minutes for the camera to restart.
- Reconfigure settings that returned to their defaults.
- If the camera is connected through the LAN, search for and add it to the NVR again if needed.
Helpful Tips
- Connect and test the camera before permanent installation.
- Reserve two NVR channels before adding the X Dual-Lens PTZ.
- Keep the Fixed Overview Camera and PTZ camera channels beside each other in Live View.
- Set the Fixed Overview Camera lens to its final angle before performing Linkage Calibration.
- Use five stationary, widely distributed scene details for calibration.
- Use a Start Point preset when the PTZ camera should return to a standard monitoring position after tracking.
- Disable Smart Linkage Tracking before using presets, scans, tours, or IVS / AI-triggered PTZ preset movements.
- For best analytics performance, position the source camera so targets move across the detection area or line.