


This guide explains how to remove an existing hard drive (HDD), install a new or replacement hard drive, and format the HDD in an X Series – Lorex Connect XC 4K 16-Channel or 32-Channel NVR.
Applicable models:
- 16-Channel: RNU01P-64B-AB1 (with pre-installed HDD) and RNU01P-6ZB-AB1 (without pre-installed HDD).
- 32-Channel: RNU01P-C8B-AB1 (with pre-installed HDD) and RNU01P-CZB-AB1 (without pre-installed HDD).
TABLE OF CONTENTS
- Before You Begin
- Step 1: Remove the Existing Hard Drive
- Step 2: Install the New Hard Drive
- Step 3: Format the Hard Drive
- Step 4: Check the Hard Drive Status and Recording Overwrite
- Helpful Tips
Before You Begin
Both the 16-Channel and 32-Channel X Series NVRs have two internal HDD bays and support compatible 3.5-inch SATA hard drives. Use a surveillance-grade drive designed for continuous recording.
What you will need:
- A compatible surveillance-grade SATA HDD appropriate for your NVR model.
- A Phillips screwdriver to remove the NVR cover and HDD mounting screws.
- The correct HDD mounting screws for the NVR.
- Access to the recorder's power connection and, after installation, a monitor and USB mouse for formatting.
Step 1: Remove the Existing Hard Drive
Follow these steps only if an HDD is already installed and needs to be removed or replaced. If the drive bay is empty, go directly to Step 2.
- Shut down and disconnect the recorder. Turn off the NVR. Unplug the power connection from the power source and disconnect all other cables from the recorder. Place the unit on a stable work surface.
-
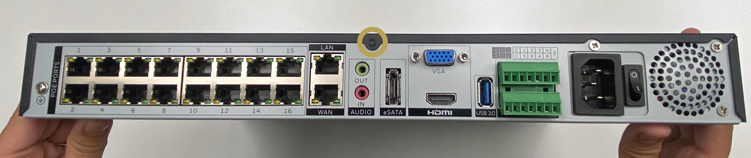
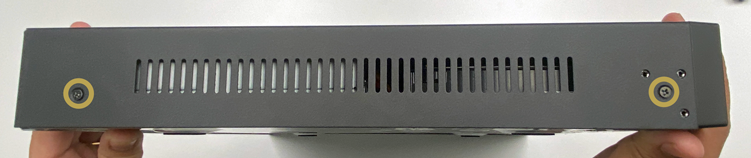
Remove the cover screws. Use a Phillips screwdriver to remove the screws holding the top cover to the chassis. Remove the four side screws (two on each side) and one rear screw. Keep the screws together for reassembly.
-
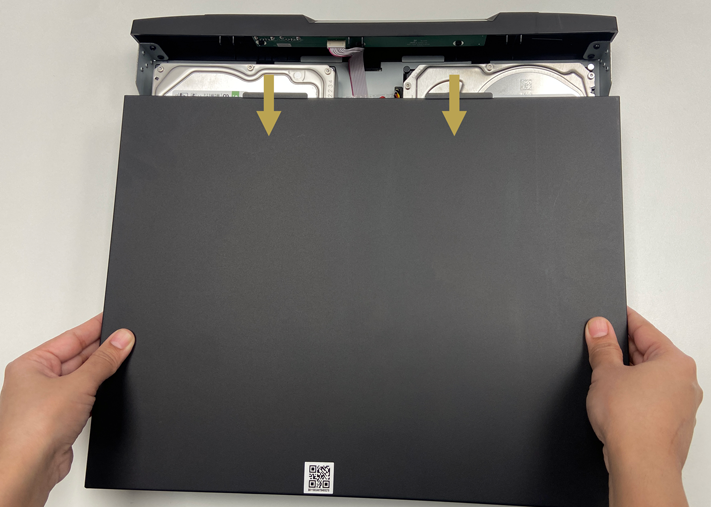
Open the cover. After the screws have been removed, slide the top cover away from the NVR, then carefully lift it off to expose the internal components.
- Support the installed drive and turn the recorder over. Hold the HDD securely in place with one hand while carefully turning the NVR over to reach the bottom panel. Continue supporting the drive so it does not shift.
- Remove the HDD mounting screws. With the bottom panel accessible, use the Phillips screwdriver to remove the four screws securing the HDD to the chassis. Keep the screws for the replacement drive.
- Turn the NVR upright again. Continue holding the now-unsecured HDD in place. Carefully flip the recorder back upright and slide the drive partway out, leaving enough room to access its connectors.
- Disconnect the HDD cables. Gently unplug both the SATA data cable and the power cable from the HDD. Pull the connectors straight out rather than pulling on the wires.
- Remove the old HDD. Once both cables are disconnected, fully lift or slide the HDD out of the recorder. The drive bay is now ready for the new drive.
Continue with Step 2: Install the New Hard Drive.
Step 2: Install the New Hard Drive
Use this procedure to install a replacement drive, or to add the first HDD to an NVR sold without a hard drive.
- Check the new hard drive. Confirm that the replacement HDD is compatible with your exact NVR model before placing it in the recorder. Use a compatible 3.5-inch SATA HDD.
- Slide the HDD into the bay. Position the drive in the recorder's internal HDD bay and carefully slide it into place. Hold the HDD with one hand while working so that it does not move.
- Connect the SATA cable. Locate the SATA data cable inside the NVR and attach it to the matching SATA connector on the new HDD.
- Connect the power cable. Attach the HDD power cable to the corresponding power connector on the drive. Check that both connectors are correctly seated.
- Turn the NVR over while holding the HDD. With one hand supporting the drive, carefully flip the recorder to expose the bottom of its chassis.
- Align the mounting holes. Line up the screw holes on the underside of the HDD with the matching holes in the NVR's bottom panel.
- Fasten the HDD to the chassis. Install and tighten the four HDD mounting screws through the bottom panel with a Phillips screwdriver, securing the HDD in position.
- Turn the recorder upright. Carefully flip the NVR back over after the drive has been secured.
- Replace the top cover. Slide the NVR cover back into position and reinstall the screws removed when opening the recorder. Secure the cover using the screws removed earlier.
- Reconnect the system. Reattach the power connection and the other cables disconnected during preparation. Turn the NVR on.
- Proceed to formatting. A newly installed drive needs to be formatted in the recorder before it can store recordings. Continue to Step 3: Format the Hard Drive.
Step 3: Format the Hard Drive
Formatting prepares a newly installed HDD for recording with the NVR. You must complete this step before the recorder can use the new drive for local video storage.
- From Live View, right-click twice to open the Main Menu.
- Click Settings.
- Select the Record tab at the top of the menu.
- Click Disk from the left-side menu.
- Click the Disk tab.
- Select the hard drive you want to format.
- Click Format, then confirm the formatting prompt.
After formatting, review the drive's status as described below.
Step 4: Check the Hard Drive Status and Recording Overwrite
Use the same Settings > Record > Disk > Disk screen to check how the NVR recognizes and uses the installed HDD.
- From Live View, right-click twice to open the Main Menu.
- Go to Settings > Record > Disk > Disk.
- Select your newly installed HDD and check Disk Status. Under normal operation, the status should display Normal.
- Review the available drive information, including Disk SN (serial number) and Used Space.
- If desired, enable Recording Overwrite so that the recorder automatically replaces the oldest recordings when the HDD becomes full. If overwrite is disabled, recording stops when the disk reaches full capacity.
- If needed, configure Disk Group (groups 1–4) and Expired Time (Day), which determines how long recordings are kept before automatic deletion.
- Click Apply to save any changed disk settings.
Helpful Tips
- Installing your first HDD? If you have RNU01P-6ZB-AB1 (16-CH) or RNU01P-CZB-AB1 (32-CH), skip removal and start with Step 2.
- Drive not available for recording? Confirm the HDD is properly installed, recognized on the Disk screen, and formatted.
- Disk status check: The Disk Status field should display Normal under normal operation.
- Need continuous storage? Enable Recording Overwrite if you want the NVR to continue recording when the HDD reaches capacity.
- More details: See Chapter 11 – Recording & Storage of the X Series 16-Channel or 32-Channel NVR user manual.