


This FAQ & Troubleshooting Guide covers the most common questions and issues for the X Series - X3 4K Dual Lens Turret Camera with Active Deterrence (CNU01P-1SW-AB1). Use it to quickly fix camera power and connection issues, image and night vision problems, audio / deterrence setup, local storage questions, and NVR / app setup.
Need more details? Refer to the camera’s Quick Start Guide, Specification Sheet, and your compatible Lorex NVR User Manual:
TABLE OF CONTENTS
- Quick Fix Checklist (Start Here)
-
Troubleshooting
- Camera does not power on / no image
- Camera offline / not detected
- Camera shows red status after being added
- Cannot access the camera in a web browser
- Dual-lens image does not look aligned
- Second lens does not appear in Multi Channel mode
- No audio / two-way talk not working
- Motion / AI detection not working
- Night vision / color night vision not working as expected
- White glare or haze at night
- Image is upside down or sideways
- microSD recordings not available in NVR or app
- Remote viewing not working
-
Frequently Asked Questions (FAQ)
- How do I connect the camera to the NVR?
- Can I use a PoE switch or 12V DC power?
- How do I add the camera if it is on the local network?
- How do I access the camera in a web browser?
- How do I reset the camera or install a microSD card?
- How do I flip or correct the camera image?
- What makes this camera different from a standard turret camera?
- What is the difference between Stitching Mode and Multi Channel mode?
- What is Stitching Distance?
- What resolution, frame rate, and field of view does it support?
- What AI and deterrence features are supported?
- Does the camera support audio?
- Does the camera support ONVIF and RTSP?
- Does the camera support local storage?
- How do I install the camera correctly?
- How do I connect the weather-resistant RJ45 cable gland?
- Can the camera be mounted on a wall or ceiling?
- What is the operating temperature and weather rating?
- What comes in the box?
- Helpful Tips
Quick Fix Checklist (Start Here)
- Power: Confirm the camera is connected to a working PoE port, a compatible PoE switch, or a supported 12V DC power source.
- Connection: Check that the Ethernet cable is fully seated at both ends and is not damaged.
- NVR: If connected through a network instead of directly to the recorder’s PoE ports, make sure the camera has been searched for or added manually in the recorder. Go to Main Menu > Settings > Channel > Camera.
- Credentials: If the camera appears with a red status, verify the correct username and password.
- Dual-Lens settings: If the wide image appears misaligned, go to Main Menu > Settings > Channel > Dual-Lens on the NVR and review the camera’s Video Mode and Stitching Distance.
- Image: Clean both lenses and make sure the protective vinyl film has been removed from the camera lenses.
- Night view: Reposition the camera away from nearby walls, soffits, glass, or other reflective surfaces.
- Turret angle: If the image looks crooked or upside down, adjust the camera position before tightening the security screw.
Camera does not power on / no image
- Confirm the camera is connected to a compatible PoE (IEEE 802.3af) source or a supported 12V DC power supply.
- If connected to an NVR PoE port, try a different port or a different Ethernet cable.
- If connected through a PoE switch, make sure the switch is powered on and the camera is on the same network as the recorder.
- Wait about 30 to 60 seconds after connecting for the camera to power on and initialize.
- If needed, test the camera with a short known-good cable close to the recorder or switch.
- Make sure the connected recorder is compatible with the camera.
Camera offline / not detected
- For the simplest setup, connect the camera directly to one of the recorder’s built-in PoE ports. It should appear automatically.
- If the camera is connected through your local network, go to Main Menu > Settings > Channel > Camera and click Start Search.
- If it still does not appear, add it manually using the camera’s IP address, protocol, port, username, and password.
- Verify the camera and recorder are on the same LAN when using a router or external PoE switch.
- If the camera was previously connected to a different system, confirm the camera password matches the credentials entered on the recorder.
Camera shows red status after being added
A red status usually means there is an authentication mismatch between the camera and recorder.
- Go to Main Menu > Settings > Channel > Camera.
- Locate the affected camera and click Modify under Operate.
- Update the camera password so it matches the NVR.
- Click OK to save.
- Use the More options menu and click Reset to let the recorder reapply settings.
Cannot access the camera in a web browser
- Make sure the camera is connected to the network and has been assigned an IP address.
- Open a web browser and enter the camera’s IP address in the address bar, then press Enter to access the login page.
- If this is the first login, enter a new camera password and click Create. The system will return to the login screen.
- Enter the camera username and password, then click Login to access the camera’s interface.
- If the camera is connected directly to the NVR’s PoE ports, it may be on the recorder’s internal PoE network and may not be reachable from a regular computer on your router network.
Dual-lens image does not look aligned
This camera uses two lenses to create one wide image. If the image appears misaligned, review the camera’s Dual-Lens settings on the NVR.
The Dual-Lens settings allow cameras with two lenses to stitch both views together into a single combined image, or split the two lenses into separate channels.
- Right-click twice to open the Main Menu.
- Click Settings.
- Select the Channel tab at the top of the menu.
- Click Dual-Lens from the left-side menu.

- Under Channel, select the channel where the dual-lens camera is connected.
- Under Video Mode, select the correct mode:
- Stitching Mode: Combines both camera lenses into a single panoramic image.
- Multi Channel: Splits the dual-lens camera into two separate channels, with one lens assigned to each channel.
- If Stitching Mode is selected, enter the approximate Stitching Distance between the camera and the monitored area. The adjustable range is 2–200 meters. This setting helps align the stitched image from both lenses.
- Click Apply to save the settings.
- Return to Live View and confirm the camera displays the image correctly.
If the image is still not aligned correctly after applying the settings:
- Confirm Stitching Mode is selected if you want one wide panoramic image.
- Adjust the Stitching Distance to better match the approximate distance between the camera and the main monitored area.
- Make sure both lenses are clean and the protective vinyl film has been removed.
- Avoid placing important objects very close to the camera, especially near the center stitching area or lens edges.
- Aim the camera so high-traffic areas are centered naturally in the overall view.
- Check the live view before fully tightening the camera to make sure the scene looks level and balanced.
- If one side of the image appears dark, blocked, or blurry, check for obstructions, fingerprints, condensation, or lens film on either lens.
Second lens does not appear in Multi Channel mode
If Multi Channel is selected, the second lens must be added to an available channel in Live View after the camera reboots.
- Open Live View and confirm that an empty channel is available.
- Click + on the empty channel.

- In the Manually Add Devices window, select the dual-lens camera from the camera channel list to automatically populate the device fields.
- Change Remote Channel to CH-2.
- Click OK to add the second lens to the available channel.
If the second lens still does not appear:
- Confirm the camera has finished rebooting after changing the Video Mode.
- Make sure there is an available empty channel on the recorder.
- Open the Manually Add Devices window again and confirm Remote Channel is set to CH-2.
- If no empty channel is available, remove an unused camera from a channel or use Stitching Mode instead.
No audio / two-way talk not working
- Confirm the camera channel supports audio and that Audio Input is enabled on the recorder (go to: Main Menu > Settings > Channel > Audio > Audio Input).
- If you want audio recording, make sure Record Audio is also enabled for that channel (go to: Main Menu > Settings > Record > Record Schedule and Enable Record Audio).
- For speaker playback, enable Audio Output for the channel and adjust the output volume (go to: Main Menu > Settings > Channel > Audio > Audio Output).
- For two-way talk from the recorder, a microphone connected to the recorder’s AUDIO IN port may be required.
- For two-way talk from mobile, use the recorder in the Lorex Connect app and start two-way talk from the camera feed.
- Make sure the phone, recorder, or monitor volume is not muted.
Motion / AI detection not working
- Confirm detection is enabled for the correct channel on the recorder.
- Review the detection area and make sure it covers the correct part of the image.
- For a wide dual-lens scene, make sure the detection area covers the full area you want to monitor.
- Adjust sensitivity if events are not being triggered consistently.
- Check the detection schedule.
- For AI events, verify you selected the correct feature, such as Person, Vehicle, Intrusion, Loitering, Wrong-Way, Unauthorized Parking, Line-Crossing, or Dual-Line Crossing.
- If you expect deterrence or warning actions, make sure the related event actions are enabled, such as Red and Blue Light, White Light, or siren.
- If events are missing at the far left or far right of the image, review the detection area and rule placement for the full wide field of view.
- If using Multi Channel mode, confirm detection settings are configured for the correct channel or channels.
Night vision / color night vision not working as expected
- Review the camera’s Day/Night settings on the recorder (go to: Main Menu > Settings > Channel > Image > Day/Night).

- If needed, switch illumination between IR LED, White LED, or Intelligent Mode depending on the scene.
- If color night video changes to black and white, the ambient light may be too low for color mode.
- For darker areas, use IR night vision. For more visible nighttime color, use white light or improve ambient lighting.
- For a wide dual-lens view, make sure both sides of the scene have enough light. One side may appear darker if it faces a less reflective or less illuminated area.
White glare or haze at night
- Move the camera away from nearby walls, soffits, branches, gutters, or other reflective surfaces.
- Do not aim the camera through glass, as infrared light can reflect back into the lens.
- Clean both lenses regularly and remove spiderwebs, dust, rain spots, or debris.
- Try adjusting the viewing angle slightly downward and away from reflective objects.
- Make sure the Ethernet connection is sealed properly outdoors using the weather-resistant RJ45 cable gland connector.
Image is upside down or sideways
- Loosen the camera and adjust the position until the image is level.
- If the camera was mounted on a wall or ceiling and the picture still looks rotated, re-aim the camera before fully tightening the security screw.
- If needed, flip the camera's image in the Lorex Connect app or in the NVR settings (go to Main Menu > Settings > Channel > Image > Image).
- After changing the physical camera angle, check the Dual-Lens settings again if the stitched image no longer looks aligned.
microSD recordings not available in NVR or app
The camera supports microSD local storage, but this works as independent camera-side recording.
- microSD recordings do not upload to the NVR.
- microSD recordings do not upload to the cloud for mobile app viewing.
- If you need recorder playback in the app, record through a compatible NVR instead.
Remote viewing not working
- Remote viewing is handled through the NVR, not by adding the camera directly.
- Confirm the recorder is connected to your router and online.
- In the Lorex Connect app, add the Recorder.
- Make sure your phone and recorder are on the same network during initial app setup.
- If the camera is recording to microSD, those camera-side recordings will not upload to the NVR or cloud for mobile app viewing.
How do I connect the camera to the NVR?
You can connect the camera directly to a compatible NVR’s built-in PoE port using a single Ethernet cable for both power and data.
- Connect one end of the Ethernet cable to the camera.
- Connect the other end to a built-in PoE port on the recorder.
- Wait about 30 to 60 seconds for the camera to power on and initialize.
- The camera should appear automatically in Live View.
Can I use a PoE switch or 12V DC power?
Yes. The camera supports:
- PoE (IEEE 802.3af)
- 12V DC
If you use an external PoE switch, connect the switch to your router, connect the camera to the switch, and then add the camera to the recorder through the local network.
How do I add the camera if it is on the local network?
- Go to Main Menu > Settings > Channel > Camera.

- Click Start Search to scan for cameras on the same network.
- Select the dual-lens camera and click Add.
- If it does not appear, click Add and enter the camera’s IP address, protocol, port, username, and password.
- Click OK to save.
How do I access the camera in a web browser?
- Open a web browser and enter the camera’s IP address in the address bar, then press Enter to access the login page.
- If this is the first login, enter a new camera password and click Create. The system will return to the login screen.
- Enter the camera username and password, then click Login to access the camera’s interface.
How do I reset the camera or install a microSD card?
-
Reset from the NVR: You can reset the camera from the recorder. Go to Main Menu > Settings > Channel > Camera, locate the camera, click the More options menu under Operate, then click Reset. When prompted, click OK to confirm.

- Reserve IP Address: When resetting from the recorder, you can leave Reserve IP Address enabled if you want the camera to keep the same IP address after reset.
- Reset from the camera: You can also use the camera’s physical reset button to restore factory settings. The reset button is located inside the reset button / microSD slot compartment on the camera, directly below the speaker. To access it, uninstall the camera from the mounting base, then remove the two screws securing the compartment cover.
- microSD: The microSD slot is located in the same reset button / microSD slot compartment directly below the speaker. To access the slot, uninstall the camera from the mounting base, then remove the two screws securing the compartment cover. Insert a compatible microSD card into the camera’s microSD slot, then re-secure the compartment cover before reinstalling the camera.
- Storage support: The camera supports a microSD card up to 1 TB.
- Important: The microSD card is not included.
How do I flip or correct the camera image?
Because this is a dual-lens turret camera, the fastest way to correct the image is usually to physically re-aim the camera before tightening the mount.
- View the camera in live view on the NVR or monitor.
- Adjust the camera until the image is level and facing the correct direction.
- Use the available mounting adjustment range as needed: Pan 360°, Tilt 90°, and Rotation 360°.
- Tighten the security screw once the scene looks correct.
If the image still needs correction after physically adjusting the camera, you can rotate it from the recorder:
- Right-click twice to open Main Menu.
- Go to Settings > Channel > Image.
- Select the correct Channel.
- Under the image settings, find Flip.
- Choose the orientation that matches the installation:
- Normal = standard view
- 90° = rotate 90 degrees
- 180° = upside down
- 270° = rotate 270 degrees
- Click Apply to save.
Optional: Use Copy to apply the same setting to other channels, or Factory Reset to restore the default image settings for the selected channel.
What makes this camera different from a standard turret camera?
This camera uses two fixed lenses to create one wide 4K image. This gives the camera a much wider view than a standard single-lens turret camera.
- The camera can stitch both lenses into one wide panoramic image.
- The wide image is useful for monitoring large areas such as driveways, storefronts, parking lots, warehouses, entrances, and open yards.
- Because the image is very wide, it may look different in small app or recorder layouts compared to a standard 16:9 camera.
- For best results, aim the camera carefully and configure the Dual-Lens settings.
What is the difference between Stitching Mode and Multi Channel mode?
The Video Mode setting controls how the camera’s two lenses are displayed on the recorder.
- Stitching Mode: Combines both camera lenses into a single panoramic image. Use this mode when you want one wide view from the camera.
- Multi Channel: Splits the dual-lens camera into two separate channels, with one lens assigned to each channel.
What is Stitching Distance?
Stitching Distance helps align the stitched image from both lenses when the camera is set to Stitching Mode.
- Go to: Main Menu > Settings > Channel > Dual-Lens and select the camera channel the dual-lens is connected to.
- Enter the approximate distance between the camera and the monitored area.
- The adjustable range is 2–200 meters.
- If the image appears misaligned, adjust the stitching distance to better match the main viewing area.
- After changing the setting, click Apply and check the image again in Live View.
What resolution, frame rate, and field of view does it support?
- Resolution: Up to 8MP (4224 × 1848)
- Aspect Ratio: 16:7
- Frame rate: Up to 30 fps
- Image Sensor: 8MP Dual 1/2.8" CMOS
- Lens: Dual fixed 2.4 mm / F1.6
- Field of View: 190.8° horizontal and 80.2° vertical
- Wide Dynamic Range: 120 dB True WDR
What AI and deterrence features are supported?
This camera supports the following smart features:
- Detection: Person, Vehicle, Intrusion, Loitering, Wrong-Way, Unauthorized Parking
- Perimeter Protection: Line-Crossing, Dual-Line Crossing
- Tracking & Monitoring: Smart Motion
- Crowd Analytics: People Counting
- Active Deterrence: Red and Blue Light, White Light, Siren, Pre-Recorded Messages
Does the camera support audio?
Yes. The camera includes:
- Microphone
- Speaker
- Two-Way Talk
Audio settings, recording audio, speaker output, and warning files are configured from the recorder.
Does the camera support ONVIF and RTSP?
Yes. The camera supports ONVIF and RTSP.
This can help when integrating with compatible recorders or network video workflows, but for best compatibility and full feature support, use a supported Lorex NVR.
Does the camera support local storage?
Yes. The camera supports a microSD card up to 1 TB for independent local recording.
Important: microSD footage does not upload to the NVR or the cloud for mobile app viewing.
How do I install the camera correctly?
- Test first: Connect the camera before permanently mounting it.
- Check the surface: Ensure the mounting surface can support the weight of the camera.
- Use the template: Apply the mounting template to the desired installation surface and drill the mounting holes at the marked locations.
- Use anchors if needed: Insert the mounting anchors into the drilled holes if required for the installation surface.
- Loosen the security screw: Use the included security key to loosen the security screw on the camera cover/base. Do not fully remove the screw.
- Separate the camera from the base: Gently pull the camera assembly away from the mounting base once the security screw has been loosened.
- Route the cable: If running the cable along the wall surface, pass the cable through the cable notch on the mounting base to keep it neatly routed and prevent pinching.
- Secure the base: Attach the mounting base to the installation surface using the provided screws.
- Reattach the camera: Reattach the camera and cover to the mounting base.
- Adjust the view: Position the dual-lens camera and adjust the viewing angle as needed.
- Lock the camera: Fully tighten the security screw with the security key to lock the camera in place.
- Remove lens film: Remove the protective vinyl film from the camera lenses.
- Connect the cable: Connect the camera cable to the Ethernet extension cable running from the NVR.
- Weatherproof the connection: For outdoor installations, install the weather-resistant RJ45 cable gland connector over the Ethernet connection. For added protection, wrap the connection with weather-resistant electrical tape to help improve the waterproof seal.
How do I connect the weather-resistant RJ45 cable gland?
Use the included weather-resistant RJ45 cable gland to help protect the Ethernet connection when installing the camera outdoors.
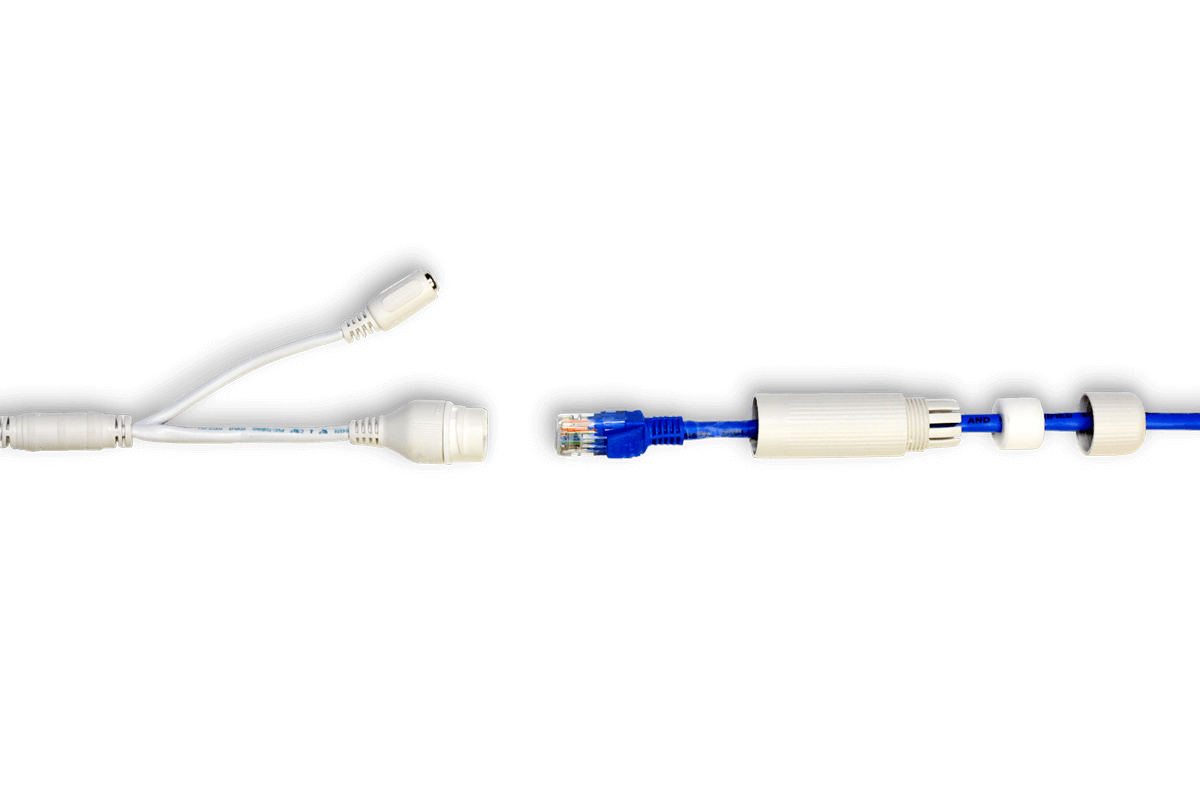
- Slide the cable gland components onto the Ethernet extension cable before connecting the cable to the camera.
- Connect the camera cable to the Ethernet extension cable running from the NVR or PoE network.
- Position the rubber seal around the Ethernet cable.
- Fit the weather-resistant gland over the Ethernet connection.
- Tighten the gland securely by hand to help seal the connection.
- For added protection, wrap the connection with weather-resistant electrical tape to help improve the waterproof seal.
Can the camera be mounted on a wall or ceiling?
Yes. The camera can be mounted on either a wall or a ceiling. After mounting, adjust the camera angle to capture the desired area.
What is the operating temperature and weather rating?
- Weather rating: IP66
- Operating temperature: -40°F to 140°F (-40°C to 60°C)
- Operating humidity: ≤ 90% RH
What comes in the box?
- X3 4K Dual Lens Turret Camera with Active Deterrence
- Mounting Template
- 3 × Mounting Anchors & Screws
- Security Key
- Weather-Resistant RJ45 Cable Gland
- Alarm I/O Terminal Block Connector
Helpful Tips
- Use the compatibility chart to confirm recorder support before installation.
- For best results, use a compatible Lorex X Series NVR for recording, deterrence actions, app access, AI event setup, and dual-lens configuration.
- Use Stitching Mode when you want one wide panoramic image from both lenses.
- Use Multi Channel mode only if you want each lens to appear on a separate channel and have an extra available recorder channel. If you change the Video Mode, wait several minutes for the camera to reboot before checking live view again.
- If you want app access to recordings, record through the NVR, not just the camera’s microSD card.
- If the camera is connected directly to the recorder’s PoE port, the recorder can usually add it automatically.
- If the camera is connected through a router or PoE switch, add it manually from the recorder.
- Before tightening the camera after installation, confirm the wide dual-lens image is level and correctly oriented in live view.
- Avoid mounting the camera where walls, soffits, poles, or glass are close to the lenses, as this can cause glare or reflection at night.
- Keep both lenses clean for the clearest daytime, nighttime, and AI detection performance.